
Knowledge Base > Salesforce > Synchronizing contacts / leads from Salesforce to inwise
You can also synchronize a view of contacts/leads from Salesforce to inwise.
Standard synchronization
On the main screen of the inwise app for Salesforce, click ‘New Sync (Manually)’:

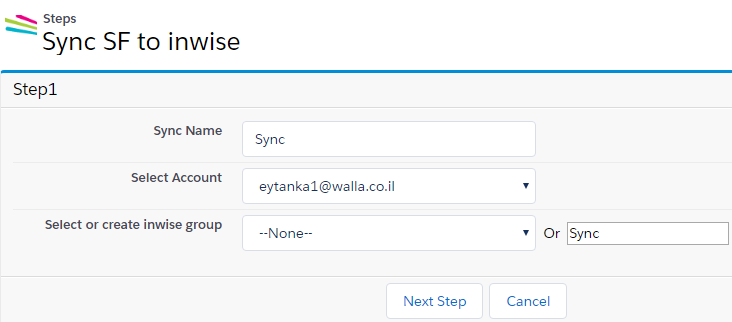
1. For the first step:
- Choose a name for the sync
- select the inwise account
- select or create a name for the inwise group (you can select an existing Salesforce group from the drop-down list)
- Move to the next step
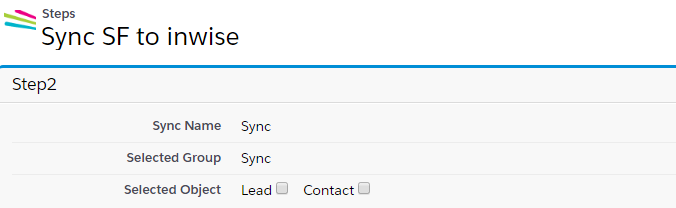
2. For the second step, select Contacts, Leads or both.
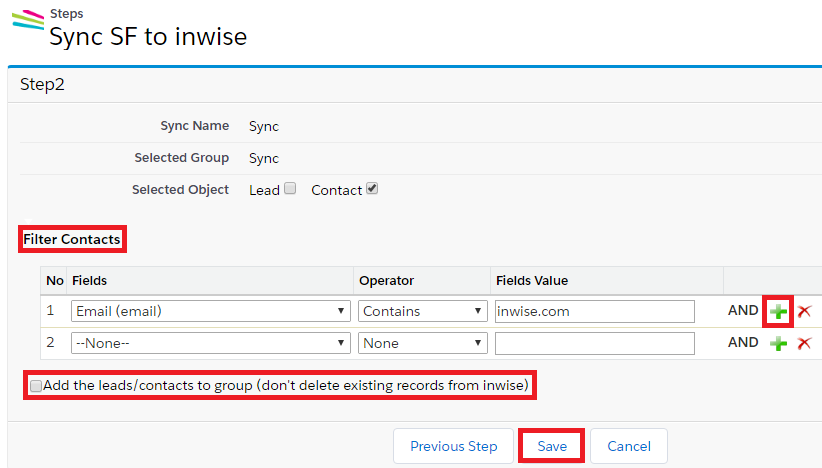
Now select the filters you want to apply to your contacts/leads. You can add another condition by clicking on the green plus icon.
Note the option: Add leads/contacts to a group (do not delete existing records from inwise)
If you do not check this option, each time the synchronization runs, all the contacts in the inwise group will be deleted and replaced with the contacts that meet the filters in the current synchronization run.
If you check this option, each time the synchronization runs, the contacts that match the filters in sync will be added to the existing contacts in the inwise group, without deleting existing contacts.
Then, click Save.
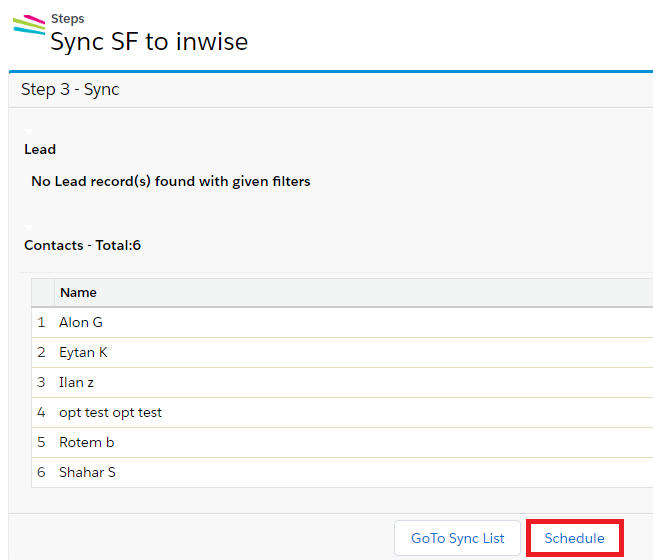
3. For the third step, you will be able to see a preview of the contacts that met the conditions that were set in the previous screen.
You can choose to schedule or run the synchronization now by clicking “Schedule”.
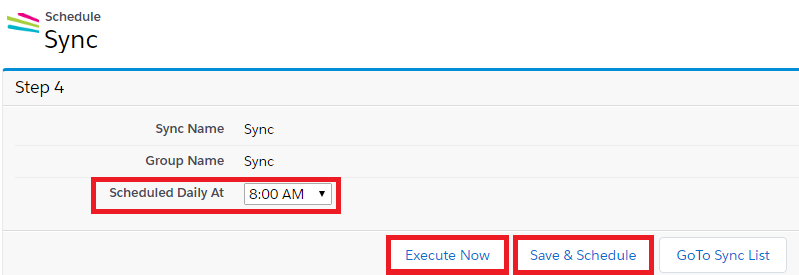
4. For the fourth step, you can schedule the synchronization to run every day at a certain time. After setting the time, select “Save & Schedule”.
Or you want to run the synchronization manually, click “Execute Now”:
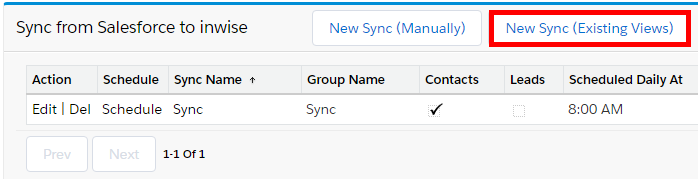
5. From the main screen of the inwise app, you can always edit the synchronization by clicking “Edit” or to run the sync manually by clicking “Schedule” and then, “Execute Now”.

6. Now you can log in to your inwise account and see that a group has been created with a number of synchronized contacts/lead:

View synchronization
The process of synchronizing a view is very similar to the standard synchronization.
Click on “New Sync (Existing Views)” on the main screen of the inwise app:
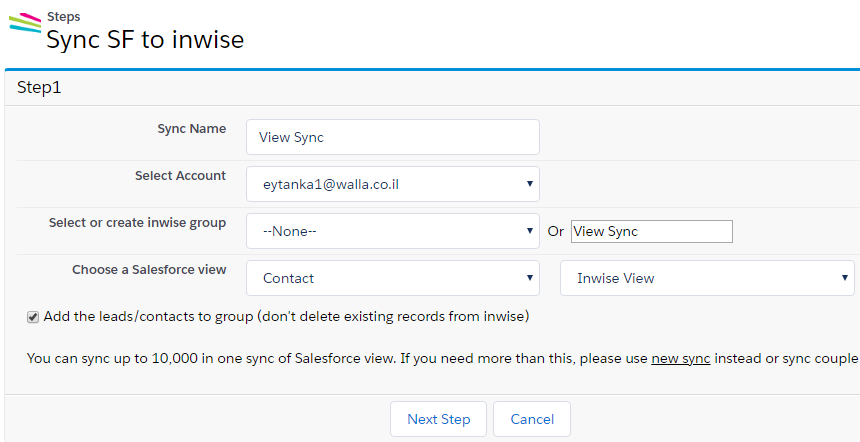
1. These are the steps
- Choose a name for the sync
- select the inwise account
- select or create a name for the inwise group (you can select an existing Salesforce group from the drop-down list)
- Then choose whether you want to synchronize a view of contacts or leads and select a View.
As in the standard synchronization screen, there is the option to delete or add to existing contacts in the group each time the synchronization runs.
Note: There is a Salesforce restriction – You can sync up to 10,000 in View Sync. If you need to sync more than this number, use the standard sync.
After completing the settings, choose “Save” to see the contacts selected from the View. Click “Save” again and go to the main screen.
By clicking on “Schedule” under the synchronization created, you can schedule a daily synchronization time or run it manually.
Now you can enter your inwise account and see a group with the synchronized contacts:
Report synchronization
The process of synchronizing a report is very similar to standard synchronization.
But first, you have to activate the Reports feature:
On the main screen of the inwise app for Salesforce, click the “Settings” button.
Under the “Logs and Custom Settings” click on “Activate Advanced Features” to turn up the report feature.

Back to the main screen of the inwise app, click on “New Sync (Existing Reports)” on the main screen of the inwise app:

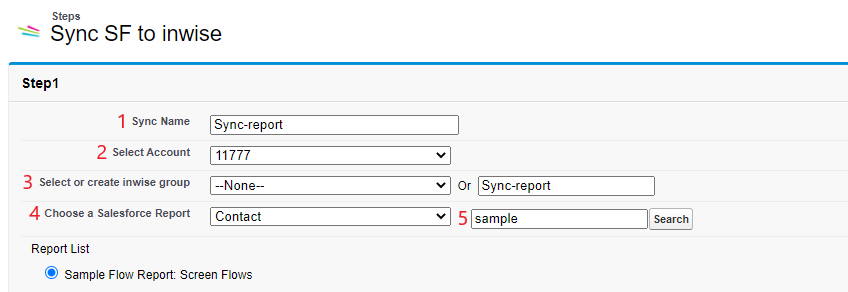
1. These are the steps
- Choose a name for the sync
- select the inwise account
- select or create a name for the inwise group (you can select an existing Salesforce group from the drop-down list)
- Choose whether you want to synchronize a report of contacts or leads.
- Enter the report name that you look for and click “Search”, and select from the drop-down list the report that you want to sync.
As in the standard synchronization screen, there is the option to delete or add to existing contacts in the group each time the synchronization runs.
After completing the settings, choose “Save” to see the contacts selected from the Report. Click “Save” again and go to the main screen.
By clicking on “Schedule” under the synchronization created, you can schedule a daily synchronization time or run it manually.
Now you can enter to your inwise account and see a group with the synchronized contacts:
Next: Automatic lead sync from landing pages to Salesforce